Client-Side Validation Flow
Introduction
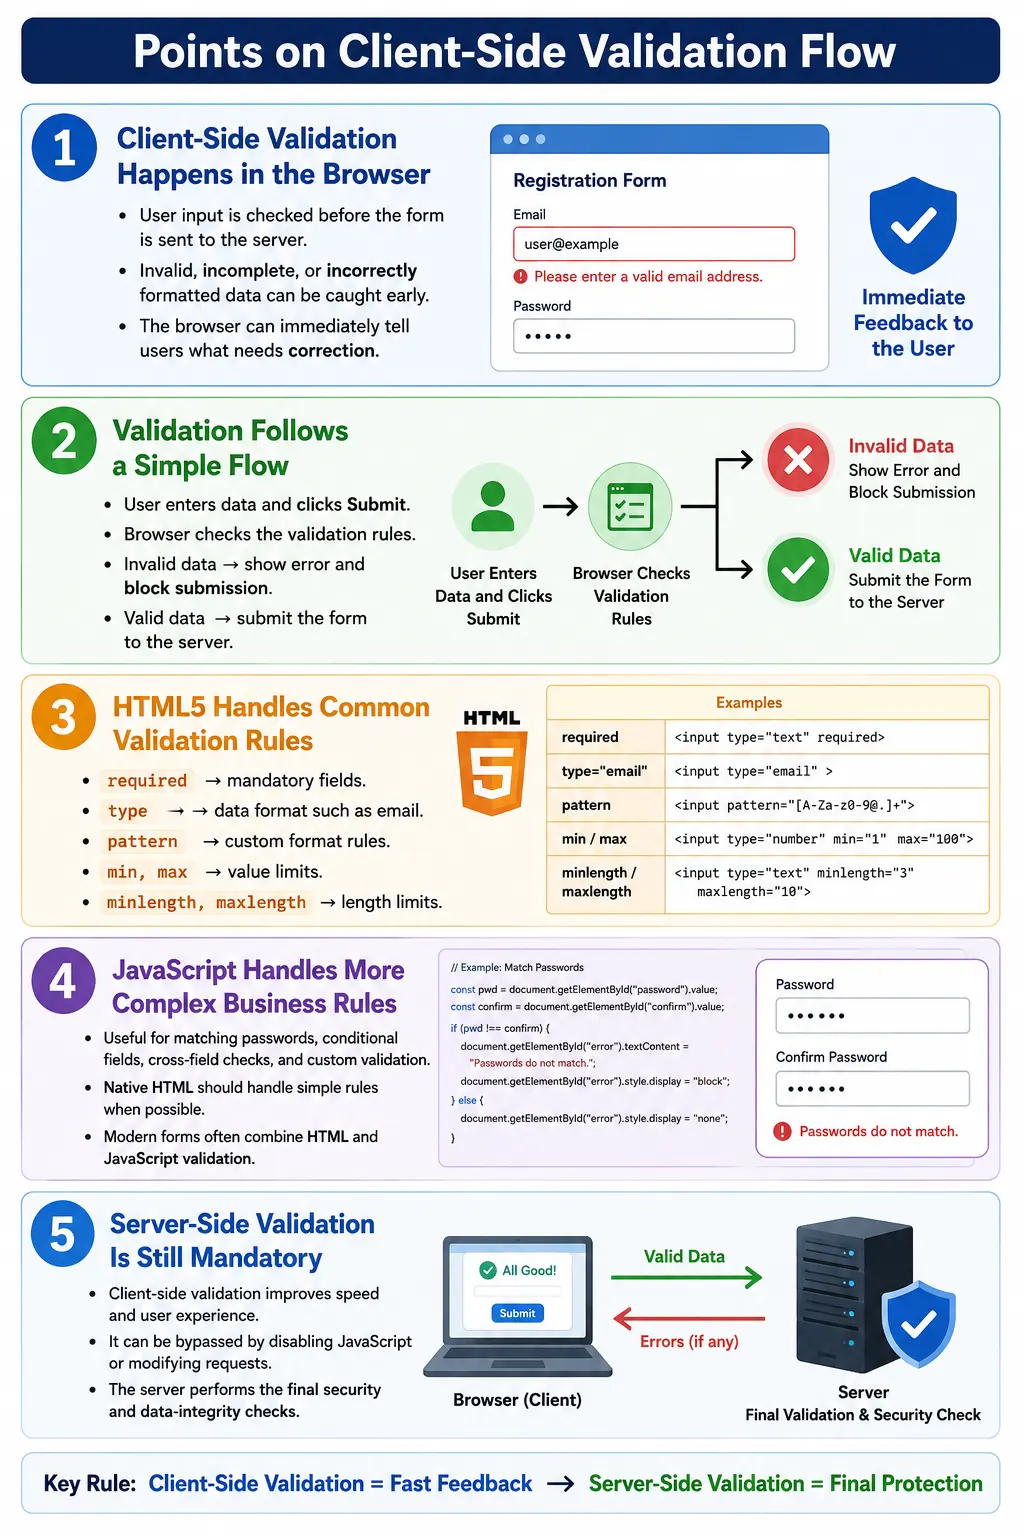
Client-side validation is the process of checking user input inside the browser before the form is submitted to the server. It helps detect invalid, incomplete, or incorrectly formatted data early. Instead of waiting for a request to reach the server and return an error response, the browser can immediately tell the user what needs to be corrected.
Modern web forms commonly use client-side validation in login pages, registration forms, checkout flows, contact forms, profile forms, search screens, survey pages, and admin dashboards. It can be implemented using HTML5 validation attributes, JavaScript, or a combination of both. HTML5 handles many common rules such as required fields, email format, minimum length, maximum length, pattern matching, and numeric ranges. JavaScript is used when validation rules are more complex or depend on business logic.
Client-side validation improves the user experience, but it is not a security mechanism. Users can bypass browser validation, disable JavaScript, modify HTML, or send requests directly to the backend. For this reason, every application must also perform server-side validation. The browser helps users correct mistakes quickly; the server protects the application and data.
What Is Client-Side Validation?
Client-side validation checks user input before the browser sends the form to the server. The validation happens in the user's browser. If the data is valid, the form can be submitted. If the data is invalid, the browser or JavaScript displays an error message and prevents submission.
User
  |
Fill form
  |
Browser validates
  |
Valid?
  |
Yes: submit
No: show error
This flow keeps basic mistakes close to the user. If an email address is incomplete or a required field is empty, the user can fix the issue immediately. There is no need to wait for a server response just to learn that a field was missing.
Client-side validation can happen automatically through browser-supported HTML attributes or manually through JavaScript code. In many forms, both approaches work together.
Why Client-Side Validation Is Needed
Without client-side validation, the browser sends the form even when the data is clearly incomplete or invalid. The server receives the request, validates it, rejects it, and sends a response back. This flow works, but it is slower and less user-friendly.
Without validation:

User
  |
Submit empty form
  |
Server receives request
  |
Rejects data
  |
Returns error
With client-side validation, the browser detects simple problems before any request is sent. The user sees the error, corrects the field, and submits again.
With validation:

User
  |
Submit
  |
Browser detects error
  |
User fixes error
  |
Submit again
This prevents invalid data from reaching the server in common cases. It also reduces unnecessary network traffic, reduces backend processing for simple mistakes, and makes the form feel faster and more responsive.
Benefits of Client-Side Validation
The biggest benefit of client-side validation is immediate feedback. Users know what went wrong as soon as they try to submit the form, or sometimes even while they are typing. This helps them correct mistakes faster and complete the form with less frustration.
Client-side validation also improves user experience by making forms clearer. Required fields, format checks, character limits, numeric ranges, and helpful messages guide the user toward valid input. When done well, validation feels like assistance rather than punishment.
It also reduces unnecessary server requests. If a field is empty or an email address is clearly invalid, there is no reason to send that request to the server. Catching the issue in the browser saves time and reduces load. The result is cleaner form submissions, fewer avoidable errors, and faster correction cycles.
Complete Validation Flow
A typical client-side validation flow begins when the user opens a form. The user enters data and clicks the submit button. The browser then checks the validation rules associated with the form controls. If any errors exist, the browser displays error messages and waits for the user to correct the data. If all checks pass, the form is sent to the server.
User opens form
  |
Enter data
  |
Click submit
  |
Browser checks validation rules
  |
Any errors?
  |
Yes: display error messages
  |
User corrects data
  |
Submit again
  |
Validation passes
  |
Form sent to server
This flow is simple, but it is central to modern form behavior. It explains why invalid forms do not submit and why users see messages before any server request is made.
Browser Validation Process
When the user clicks Submit, the browser checks different validation rules. It checks required fields, input types, pattern rules, length rules, minimum and maximum values, and then any custom JavaScript validation that the application has implemented.
Required fields
  |
Input types
  |
Pattern rules
  |
Length rules
  |
Min / max values
  |
Custom JavaScript
  |
Submit form
If every check passes, the browser submits the form. If a check fails, the browser blocks submission and shows an error. The exact message depends on the browser, operating system, language settings, and validation rule.
Step 1: User Enters Data
The flow starts when the user enters data into a form field. Consider an email input marked as required.
<input type="email" required>If the user types john@, the field is not empty, but it is not a valid email address. The browser has enough information to check both rules because the input uses type="email" and the required attribute.
Step 2: Browser Reads Validation Rules
When submission is attempted, the browser reads the validation rules from the HTML attributes. In the email example, the browser detects that the field is required and that the value must follow email format rules.
These rules come from the markup itself. The developer does not need to write JavaScript for this basic validation. The browser understands the meaning of required and type="email".
Step 3: Browser Validates
The browser compares the user's input with the validation rules. In this case, it checks whether john@ is a valid email address.
Input
  |
john@
  |
Valid email?
  |
No
Because the value is incomplete, validation fails. The form is not submitted.
Step 4: Error Message
After validation fails, the browser displays an error message. For an invalid email, the message may be similar to:
Please enter a valid email address.The exact wording varies across browsers and operating systems. A tester should avoid assuming that every browser will display the same text unless the application uses custom validation messages.
Step 5: User Corrects Data
The user corrects the value. For example, the user changes john@ to:
john@example.comNow the value satisfies the email format rule. If there are no other invalid fields, validation can pass.
Step 6: Form Submission
When all validation rules pass, the browser sends the data to the server.
All rules pass
  |
Browser sends data
  |
Server
At this point, the server must validate the data again. The server should never assume that browser validation was performed or that the submitted value is safe.
HTML5 Validation Example
A simple HTML5 validation example uses an email field with the required attribute.
<form>
  <label for="email">Email</label>
  <input id="email" type="email" required>

  <button type="submit">Submit</button>
</form>
Before submitting, the browser checks whether the field is filled and whether the entered value has an email-like format. This is one of the simplest examples of useful client-side validation without custom JavaScript.
Multiple Validation Rules
A single field can have multiple validation rules. A password field may be required and may need a minimum and maximum length.
<input
  type="password"
  required
  minlength="8"
  maxlength="20">
The browser validates the required rule, then the minimum length rule, and then the maximum length rule. If the value is empty, the required rule fails. If it has fewer than eight characters, the minimum length rule fails. If it exceeds twenty characters, the maximum length rule fails.
Pattern Validation
The pattern attribute validates input against a regular expression. It is useful for custom formats such as usernames, IDs, postal codes, and simple codes.
<input type="text" pattern="[A-Za-z]{3,15}">If the user enters John123, the browser reports a pattern mismatch because the pattern allows only letters between three and fifteen characters. This is a common validation rule in fields that require a specific format.
Number Validation
Number inputs can use min and max rules. For example, an age field may allow only values from 18 to 60.
<input type="number" min="18" max="60">If the user enters 15, the browser detects that the value is below the minimum. The form does not submit until the value is corrected or the rule is changed.
JavaScript Validation
Sometimes HTML validation is not enough. HTML can check required fields, formats, lengths, and ranges, but many applications need custom business rules. JavaScript can validate conditions such as password strength, matching passwords, conditional required fields, cross-field dependencies, selected options, dynamic totals, or custom messages.
if (password.length < 8) {
  alert("Password too short");
}
JavaScript validation is flexible, but it should not be used for everything. Many simple validations are better handled with native HTML attributes because they require less code and work consistently with browser validation APIs.
HTML and JavaScript Together
Modern applications often combine HTML validation and JavaScript validation. HTML handles basic rules. JavaScript handles complex business rules and custom user experience. Server-side validation performs the final security and data integrity checks.
HTML validation
  |
JavaScript validation
  |
Server validation
Each layer has a different purpose. HTML is fast and simple. JavaScript is flexible and interactive. Server validation is mandatory and authoritative.
Browser Validation vs Server Validation
Client-side validation is fast and improves user experience, but it can be bypassed. A user can disable JavaScript, remove HTML attributes in developer tools, or send a request directly using another tool. Therefore, client-side validation cannot protect the application by itself.
Server-side validation is secure, final, and required. It checks the submitted data after it reaches the backend. It must verify required fields, formats, permissions, business rules, database constraints, and security conditions.
| Validation Type | Purpose |
|---|---|
| Client-side validation | Fast feedback and user experience |
| Server-side validation | Security, final validation, and data integrity |
Example Registration Flow
A registration flow commonly includes name, email, password, and a submit button. When the user clicks Register, the browser checks the visible validation rules before sending the request.
User opens form
  |
Enter name
  |
Enter email
  |
Enter password
  |
Click Register
  |
Browser checks
  |
All valid?
  |
Yes
  |
Server
  |
Database
This flow prevents simple mistakes from reaching the server. The server still validates everything before creating the account or writing to the database.
Browser Error Examples
Browser validation messages vary. For a required field, the browser may show:
Please fill out this field.For an invalid email field, it may show:
Please enter a valid email address.For a number below the minimum value, it may show:
Value must be greater than or equal to 18.Because wording varies, automated tests should be careful when asserting exact browser-native messages. Exact text may differ by browser and system language.
Common Mistakes
The most serious mistake is trusting client-side validation as if it were enough. Browser validation is not enough. Users can bypass it. Always validate on the server.
Another mistake is disabling validation without a clear reason.
<form novalidate>The novalidate attribute disables HTML5 browser validation. It should be used only when validation is intentionally handled elsewhere, usually through a custom JavaScript validation framework.
Another mistake is using JavaScript for every validation rule when native HTML attributes would be simpler. Fields such as required email, minimum length, maximum length, numeric range, and pattern validation can often be handled directly in HTML.
Finally, some applications provide unclear validation messages. If custom validation is used, messages should explain what failed and how the user can fix it.
Real-World Example
A simple SoftwareTips4U registration form may use native validation attributes for common rules.
<form>
  <input
    type="text"
    required
    placeholder="Name">

  <input
    type="email"
    required
    placeholder="Email">

  <input
    type="password"
    required
    minlength="8"
    placeholder="Password">

  <button type="submit">Register</button>
</form>
Validation occurs before any request is sent. Empty fields, invalid email format, and short password values can be caught by the browser.
Selenium Perspective
Automation testers commonly verify required field validation, email validation, pattern validation, number validation, error messages, and successful submission with valid data. Selenium can click the submit button and then inspect validation behavior.
driver.findElement(
    By.tagName("button"))
    .click();
Browser validation messages can be read using the validationMessage property exposed by form controls.
WebElement email =
driver.findElement(By.id("email"));

String message =
email.getAttribute("validationMessage");

System.out.println(message);
The validation message depends on the browser and system language. For more reliable checks, automation may verify whether the form was submitted, whether the field is valid through JavaScript, or whether the application displays custom error messages.
Validation Layers
| Layer | Purpose |
|---|---|
| HTML5 Validation | Basic browser validation |
| JavaScript Validation | Complex business rules and custom checks |
| Server Validation | Final security and data integrity checks |
Common Interview Questions
What is client-side validation? It is validation performed by the browser before submitting a form to the server.
What are the advantages of client-side validation? It provides faster feedback, better user experience, fewer unnecessary server requests, and faster error correction.
Does client-side validation replace server-side validation? No. Server-side validation is always required for security and data integrity.
Which technologies perform client-side validation? HTML5 validation attributes and JavaScript perform client-side validation.
What happens if validation fails? The browser prevents form submission and displays an error message.
Which attribute disables browser validation? The novalidate attribute on the <form> element disables browser validation.
Interview-Ready Answer
Client-side validation is the process of validating user input within the browser before sending data to the server. It uses HTML5 validation attributes such as required, pattern, min, max, and type, along with JavaScript for more advanced rules. If validation fails, the browser prevents form submission and displays an appropriate error message. While client-side validation improves usability and reduces unnecessary server requests, it can be bypassed, so server-side validation is always required to ensure security and data integrity.
One-Line Insight
Client-side validation improves the user experience; server-side validation protects the application.